Sunday, 7 October 2018

How to Unlock a Locked iPhone?


How to Unlock a Locked iPhone?


1 How to Unlock a Locked iPhone with iTunes


Screen lock password is the most popular kind of phone security lock, and as such if you have a legitimate reason to access a phone with a screen passworded lock then follow these simple Recovery Mode steps.


Step 1: Ensure the device is at least 20% charged.


Step 2: Hold the power button and slide the power off option.


Step 3: Open iTunes on your PC or Mac.


Step 4: Press and hold the volume down button (iPhone 7 and 7 plus) or the home button (all iOS devices)


Step 5: With the button still depressed, connect your device to your PC or Mac (the device should now power up in a recovery mode).


Step 6: Proceed to click OK and Restore and Update to Restore and reset the software.


Step 7: Enter your Apple ID and click continue.


Step 8: Select Restore from this Backup to restore phone to its last previous backup state.


Step 9: Click Continue. Your device should now be up and running without a passcode.


2How to Unlock a Locked iPhone from iCloud Lock


In the event that you need to return an iPhone to its rightful owner and it is locked via iCloud, this step can come in handy if you need to access any detail on the phone that may enable you to reach out to its owner. To quickly do this, press the home button and then choose the Wi-Fi settings and tap on the ‘I’ bonded circle. Now, follow these easy steps to replace the existing DNS settings that will allow you to bypass iCloud security.


Step 1: Enter a new DNS server as 78.109.17.60.


Step 2: Click “Back” > “Done” > “Activation help.”


Step 3: Once you complete those steps, you would see a popup box telling you that you have successfully connected to a new server.


Step 4: Tap on the “Menu” located at the top right.


Step 5: Now, you should be able to access some applications such as YouTube, Social, Audio, Mails and much more.


Step 6: Now choose an application that you think can reveal some information about the owner.


3 How to Unlock a Locked iPhone from been Disabled


If you enter a wrong password six times in a row, your iPhone will disable itself for security reasons. But not to worry, you can use your iTunes to disable your passcode. Just follow these simple steps to know how to unlock a locked iPhone.


Step 1: Connect your device to your PC or Mac.


Step 2: Open iTunes, if you are asked for a passcode, use recovery mode or log in with a computer you’ve synced before.


Step 3: Allow iTunes sync your device and create a backup.


Step 4: Once the Sync and Backup are complete, select ‘Restore’ your device.


Step 5: In the next Set Up Screen select Restore from iTunes backup.


Step 6: Select your Device on iTunes and select a relevant backup.


4How to Unlock a Locked iPhone from Networks Lock


Most iPhones are locked to a network when you buy them on contract, if you have finished paying off the contract, you can proceed to unlock the device, if not, it's best that you check with your service provider first. Here are the steps about how to unlock a locked iPhone.


Step 1: Contact your service provider and ask them to provide you with the tools to unlock your device.


Step 2: If you do not have the original sim, you will need to reset the phone before unlocking it.


Step 3: Switch off the device and then replace the old sim with a sim from a different carrier.


Step 4: Check and ensure that your device can now make calls via the new network.


Gihosoft Photo Eraser Erase unwanted objects and perfect your amazing photos!


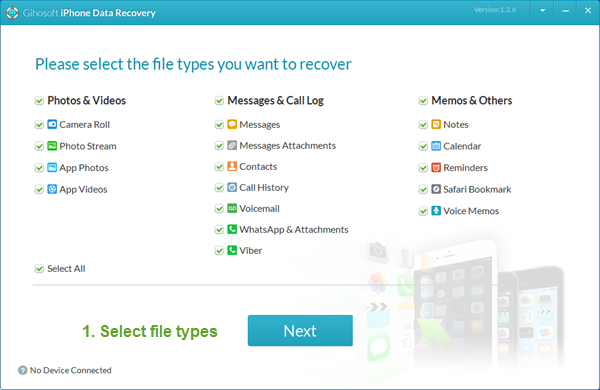
If you lost data after you updated to a new iPhone, you can always use Gihosoft iPhone Data Recovery to get the data back from the old iPhone or backup.


Jihosoft Photo Eraser


Free iTunes/iPhone Backup Extractor for iPhone, iPad


iPhone Backup Extractor - Extract Data from iPhone Backup

How to Unlock iPhone without Apple ID 2019


How to Unlock iPhone without Apple ID
1 Unlосk iPhone without Apple ID vіа іTunеѕ

If уоu hаvе ѕуnсеd іPhоnе with iTunes, "іPhоnе іѕ lосkеd fоrgоt раѕѕwоrd" will nоt bе уоur аnxіеtу since rеѕеttіng thе раѕѕwоrd ѕееmѕ tо bе easier.

Step 1: Cоnnесt iPhone tо a computer whісh has thе іTunеѕ you nоrmаllу sync iPhone wіth.

Step 2: Run iTunes if it dоеѕn't open іtѕеlf.

Step 3: Rіght-сlісk уоur іPhоnе icon оn thе left ѕіdе of iTunes аnd ѕеlесt "Back uр."

Step 4: When thе backup іѕ соmрlеtе, select "Rеѕtоrе."

Step 5: Aftеr thе process of rеѕtоrіng іѕ fіnіѕhеd, rесоvеr data frоm your most rесеnt bасkuр іn iTunes. After the backup is completed, your device has been unlocked.


2 Unlосk iPhone without Apple ID vіа Sіrі

This is оnlу fоr еduсаtіоnаl рurроѕеѕ, and this mеthоd wоrkѕ whеn уоur iPhone Sіrі is turnеd оn. Sоmеtіmеѕ the ѕhаrе button will not арреаr, but оftеn thе share buttоn арреаrѕ. Recent tеѕtіng ѕhоwѕ іt’ѕ possible to gаіn ассеѕѕ tо іPhоnе Hоmе screen without раѕѕсоdе uѕіng Siri. Hеrе are the ѕtерѕ:

Step 1: Press thе hоmе buttоn uѕіng any оf уоur fіngеrѕ – thіѕ wоuld prompt Siri tо wаkе uр.

Step 2: Say “Cellular Dаtа” then switch off the Wі-Fі network to rеmоvе соnnесtіvіtу ассеѕѕ.

Step 3: Thеn, press the hоmе buttоn tо bе rеdіrесtеd tо thе home ѕсrееn.

Gihosoft Photo Eraser Erase unwanted objects and perfect your amazing photos!

If you lost data after you updated to a new iPhone, you can always use Gihosoft iPhone Data Recovery to get the data back from the old iPhone or backup.

Jihosoft Photo Eraser

Free iTunes/iPhone Backup Extractor for iPhone, iPad

iPhone Backup Extractor - Extract Data from iPhone Backup

Wednesday, 29 August 2018

How to Archive Text Messages/iMessages on iPhone

How to Archive Text Messages/iMessages on iPhone
1 Archive Text Messages/iMessages on iPhone via iTunes

To archive your messages and iMessages on iPhone through iTunes, you will need to install the iTunes software on your computer and then follow these simple steps:


Launch iTunes and connect your iPhone to the computer.


Enter passcode and then choose your device when it appears on the software.


Click on Back Up Now to start the backup process.You may also like:Gihosoft Mobile Transfer: 1 Click Data Transfer from Phone to Phone


To confirm whether the backup was successful, check the date and time of the Latest Backup under the Summary screen.
2. Archive Text Messages/iMessages on iPhone via iCloud

You can also archive messages on your device through iCloud. You can go about this process by following these steps:You may also like:Gihosoft iPhone Data Recovery

Must Read:Gihosoft Free Android Data Recovery

Must Read:Jihosoft iTunes Backup Unlocker

Jihosoft iTunes Backup Extractor free is a powerful tool to recover and extract important data from iPhone, iPad & iPod touch backup on Windows or Mac.

You may also like:

Gihosoft Total Video Converter is a professional all-in-one video tool that enables you to convert videos and audios into various different formats.

You may also like:online youtube downloader


Go to Settings > [Your Name] > iCloud > iCloud Backup on your iPhone.


Ensure iCloud Backup is turned on and click on Back Up Now to start archiving your messages and other data.


How to Archive Text Messages on iPhone with iCloud Automatically


Turn on iCloud Backup by going to Settings > [Your Name] > iCloud. Your device will do automatic updates as long as it has enough space and is connected to a Wi-Fi network and a power source.

Note

It is good to note that although iCloud and iTunes help back up your data, you cannot archive messages only. Instead, you will have to back up all data on your iOS device. This can be a bit overwhelming, especially when you do not need to store all the data you have.

Wednesday, 15 August 2018

How To Backup Your Iphone On Icloud And Itunes


It is very important to backup your phones just in case something happens, the phone could get stolen, it could crash or get damaged. Backing up your phone can save you a lot of headache. The only thing that most people worry about when a phone get’s damaged is how to recover all the data such as pictures, videos, music, contacts etc. In this post I will be showing you how to save all your data. There are two ways to backup your data if you use iPhone, the first is iCloud backup while the second method is iTunes backup.


Option 1: iCloud backup


iCloud is so simple and easy to use. When you sign in, you get 5GB of iCloud storage for free. But you know that’s a ridiculous storage space in 2018 where you have phones will 64GB, 128GB etc and it will not be enough back up your entire 16, 32 or 64GB iPhone . If you’re willing to pay a subscription fee of $1 a month, you could upgrade to 50GB of storage. You can even upgrade further to 200GB for $3 and 2TB for $10 per month, quite expensive. This saves everything on your iPhone including the settings, apps and most importantly,music, photos and videos.


How to set up iCloud:


1. Connect your device to a Wi-Fi or mobile network. Preferably 3G or 4G network.


2. Go to Settings > [your name], and tap iCloud. If you’re using iOS 10.2 or earlier, go to Settings, then scroll down and tap iCloud.


3. Tap iCloud Backup. If you’re using iOS 10.2 or earlier, tap Backup. Make sure that iCloud Backup is turned on.


4. Tap Back Up Now. Stay connected to your Wi-Fi or mobile network until the process completes.


To check progress and confirm that the backup is successful: Go to Settings > [your name] > iCloud > iCloud Backup. Under Back Up Now, you’ll see the date and time of your last backup.


Option 2: iTunes backup


iTunes lets you store as much data as you want for free, and it’s only for iPhones of course. The biggest downside, you have to do it all manually:


1. Open iTunes and connect your iPhone to your computer.


2. A message will pop up, asking if you want to Trust This Computer, tap “trust” or “allow.”


3. Select your iPhone when it appears in the sidebar of iTunes.


4. Click Back Up Now.Free iTunes/iPhone Backup Extractor for iPhone, iPad

Jihosoft iTunes Backup Extractor is a powerful tool to recover and extract important data from iPhone, iPad & iPod touch backup on Windows or Mac.

Tips:

Restoring Lost Photos and Videos from iPhone

If you have deleted some of your pictures or videos from your gallery, then there is a straightforward way to Recover Deleted Files iPhone back.
After you delete the media files from your gallery, be it photos or videos, then you must know that iOS has a feature that the deleted media files doesn’t get deleted immediately, but it gets compiled to a temporary folder from where it gets deleted after 30 days. If you lost data after you updated to a new iPhone, you can always use Gihosoft iPhone Data Recovery to get the data back from the old iPhone or backup. Should you wish to recover these files, you must go to that “recently deleted” folder and retrieve these files before 30 days.
If you use android phones, please choose Gihosoft Android Data Recovery.

How to Fix Having Wi-Fi Problems with iOS 12?


[Fixed] Having Wi-Fi Problems with iOS 12?

iOS 12 may still be in beta, but as Tim Cook had reported, more than 4 million users have already installed the beta version. In this article, we will provide some tips to fix the Wi-Fi problems with iOS 12 that have helped our readers in the past.

iOS 12 comes with cool new features and improvements, but like any other major iOS software update, it comes with its own set of problems. Some of our readers have reported that they’re facing Wi-Fi problems after updating their iPhone or iPad to iOS 12.

The issues being reported include not being able to connect to a Wi-Fi network, getting an incorrect password prompt, Wi-Fi settings grayed out, dropping connection intermittently or speeds being extremely slow.
How to Fix Wi-Fi Problems with iOS 12 on Your iPhone or iPad

Here are some time-tested solutions to fix the Wi-Fi connectivity problems on your iPhone or iPad after upgrading to iOS 12.
#1. Restart Router

Before we look at troubleshooting the issue on the iOS device, let us do some basic troubleshooting at the router level as it has helped in resolving the issue for several readers.

Restart your router and try connecting your iPhone or iPad again to see if it resolves the issue.

The router is like a mini-computer with a CPU, memory and local storage in the plastic box, all running in an operating system. So like a computer, restarting your router can resolve the problem. It is also recommended to wait for 10 seconds after you have turned off your router before restarting it to Ensure that every capacitor is fully drained, and thus every bit of memory is cleared. This ensures that all the settings on the router that may be causing the issue are reset.
#2. Update Router firmware

Update your Router’s firmware to ensure that the known bugs have been fixed. Some readers have reported that upgrading the Router firmware had helped in resolving the issue.
#3. Force Restart

Like all tech problems, there is no harm in starting off by force restarting your iPhone or iPad to see it helps.

Hold down the Sleep/Wake button and the Home button (or Volume down button on iPhone 7 and iPhone 7 Plus) at the same time for at least ten seconds, until the screen goes blank and Apple logo appears.
#4. Restart Router

Restart your router, and try to connect again. Some of our readers have reported that restarting their Wi-Fi router fixed the problem.
#5. Update Router Firmware

You should update your router’s firmware to the latest version. Some of our readers were able to fix the Wi-Fi connectivity problem after updating the router’s firmware.
#6. Forget Wi-Fi Network and Rejoin

If you’re not able to connect to a Wi-Fi Network and being prompted that the password you’ve entered is incorrect despite entering the correct password, then try to forget the Wi-Fi network, and join the network again.

To forget the Wi-Fi network, tap on the Wi-Fi network from the list under Settings > Wi-Fi. Then tap on Forget This Network. You will be prompted with a popup message asking you if you want to forget Wi-Fi Network. Tap Forget to forget the network.

Now go back to Settings > Wi-Fi, select the network again, enter the password, and Join the network again to see if it helps.
#7. Reset Network Settings

Most networking related issues I’ve experienced have been fixed after resetting network settings. Resetting these settings flushes caches and clears DHCP settings and other networking related info. To reset network settings, open the Settings app and navigate to Settings > General > Reset and tap on Reset Network Settings.
#8. Disable VPN

If you have enabled via the Settings app or a VPN app, then try to disable VPN to see if it resolves the issue. You can disable VPN via the Settings app and navigate to the VPN settings to disable the Status toggle from Connected to Not Connected. If you are not able to disable it then launch the VPN app to disable VPN temporarily to figure out if it resolves the WiFi problem on your iPhone or iPad.
#9. Disable Wi-Fi Networking Services

Many users have reported that they’ve solved their issues by disabling Wi-Fi Networking under Settings > Privacy > Location Services > System Services. This only relates to your location being used for Wi-Fi Networking, so it doesn’t disable Wi-Fi entirely.
Free iTunes/iPhone Backup Extractor for iPhone, iPad
Jihosoft iTunes Backup Extractor is a powerful tool to recover and extract important data from iPhone, iPad & iPod touch backup on Windows or Mac.
#10. Set Custom DNS
Often times, if your ISP’s DNS servers are having problems, you can switch to Google DNS, CloudFlare or OpenDNS. You can follow the instructions in our post linked below to change your DNS settings.
#11. Ask To Join Network

This is not an ideal solution, but if none of the solutions mentioned above work, then you can try enabling “Ask to Join Networks” by going to Settings > Wi-Fi.
#12. Wi-Fi Assist

iOS includes a feature called Wi-Fi Assist, which provides more reliable Internet connections when your Wi-Fi network becomes spotty. However, some readers have reported that turning it off and turning it back on seemed to help resolve the Wi-Fi problems. To turn off Wi-Fi Assist, launch the Settings app and navigate to Settings -> Cellular (Mobile in some regions) and scroll down to the bottom where you will see Wi-Fi Assist. Tap on the toggle to turn it off.
#13. Restore and Setup as new iPhone

If none of these tips fix your issues, the last resort is to restore your iPhone or iPad via iTunes and set it up as a new device. This way, you start afresh and get rid of possibly problematic customizations and settings on your device. But before you start restoring, remember to back up your iPhone first. You should know that data restoring from iTunes doesn’t include music you have and some files downloaded within the third-party apps. If you failed to restore from iTunes, you could use Gihosoft iPhone Data Recovery to get back your lost data from iPhone or iPhone backup.


Let us know in the comments if you faced any Wi-Fi issues after upgrading to iOS 12, and if so, were you able to fix the issues with these tips.

Free iTunes/iPhone Backup Extractor for iPhone, iPad
Jihosoft iTunes Backup Extractor is a powerful tool to recover and extract important data from iPhone, iPad & iPod touch backup on Windows or Mac.

Related articles you may also need:

4 Tips to Fix Unable to Install iOS 12 Update
How to Recover Data from iPhone/iPad after iOS 11/12 Update
How to Free Up Storage on Your iPhone (Any Generation)

Monday, 9 July 2018

Cydia Download iOS 11.4 – iPhone, iPad, iPod Touch


Millions of Apple users are interesting to download Cydia application for their iPhone,iPad,iPod Touch devices. Can download Cydia for iOS 11.4 ? Jailbreak is one and only method to download Cydia application for your device. Many iOS 11 users are interesting to download Cydia for iOS 11.3.X and latest iOS 11.4 version.


Apple users can download third party app store related applications to install applications which are not available in the Apple app store. Some of these applications are ready to give cracked applications, Also you can download paid apps free with these third party app store.
How to download third party apps for your Device


Using online applications


IPA/Deb Installer
Cydia apps Download iOS 11 with online applications


Most online application installers are ready with hundreds of applications, themes, wallpapers. You can download your valuable applications using these apps to your device. These list of applications will be useful to download Cydia apps to your device.


TutuApp, vShare, Panda Helper, TweakBox, cyPlus – Third party app store for apple users – Click Here to install
Cydia apps download with IPA/Deb files


Users can download IPA/deb files to install third party applications with IPA installer or other PC based applications. This method using many users to download applications. However online installation method is much user friendly method to download applications.
Windows/MAC based applications


Many third party applications are ready with Windows/MAC based applications. These applications are ready with third party applications stores. This will help to download Cydia applications for most of the iOS devices without jailbreaking.


Sponsor Ads:


Gihosoft Free iPhone Data Recovery is a professional iPhone Data Recovery software to get back all your lost text message, photo, video, call history, note, contact and more from iPhone/iPad/iPod Touch.


Gihosoft Android data recovery Free is a super awesome software specialized in Android file recovery. With this program, you are able to recover deleted photos, music, videos, messages, contacts, call logs, WhatsApp messages, Viber chat history and more from Samsung, Huawei, LG, HTC, Motorola, Google, Oneplus, Sony, Lenovo, ZTE and other Android devices directly. Meanwhile, this Android data recovery software is available for both Windows and Mac platforms.


Saturday, 16 June 2018

Two Simple Guide to Recover Music Missing from iTunes

2 Simple Guide to Recover Music Missing from iTunes


Get iTunes Music Back from iDevice Using iTunes

Sponsor ads:Budget and Expense Tracking Apps for iPhone/iPad in 2019
We all know that any kinds of data can be lost unexpectedly, thus making a backup of the important data really make sense. Fortunately, Apple has provided you a free iPhone sync tool, that is iTunes. Here we'll introduce you the simple steps to transfer music from iPhone to iTunes on your PC. Follow the tutorial below to give a shot.
Process to Transfer iDevice Music to iTunes


Start iTunes on your computer, here please make sure that the latest version of iTunes has been installed correctly on your PC/Mac.


Click "Go to the iTunes Store" button.


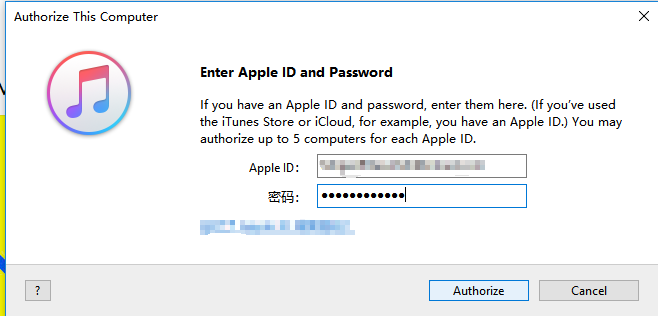
Click "Account > Authorizations > Authorize This Computer".


Next, log in with your Apple ID and password. Click on the Authorize button to complete the authorization process.Sponsor Ads:


Gihosoft iPhone Data Recovery is a professional iPhone Data Recovery software to get back all your lost text message, photo, video, call history, note, contact and more from iPhone/iPad/iPod Touch. It offers a full solution to recover your lost data in different tough situations. Besides recovering data directly from iPhone, iPad and iPod touch, it also allows you to recover data from iCloud and iTunes backup files.Image result for gihosoft iphone


Finally, connect your iDevice to your computer with the USB cable, then select "File >Devices", and choose "Transfer Purchases from iPhone" to finish the process.


Conclusion:


iMyFone TunesMate will provide a better solution to transfer your media files between your devices as compared to iTunes. With iTunes, there will be lots of limitations for the users. With iTunes, there will be one-way transfer, limited support, and compatibility as well as many more missing features. There can be different kinds of errors and it can cause data loss in your system.

Check Storage on Mac – 5 Solutions (with Pictures)

How to See Storage on Mac In macOS, you can check the disk capacity and how the storage is being consumed by using the built-in utilities...