Saturday, 16 June 2018

Two Simple Guide to Recover Music Missing from iTunes

2 Simple Guide to Recover Music Missing from iTunes


Get iTunes Music Back from iDevice Using iTunes

Sponsor ads:Budget and Expense Tracking Apps for iPhone/iPad in 2019
We all know that any kinds of data can be lost unexpectedly, thus making a backup of the important data really make sense. Fortunately, Apple has provided you a free iPhone sync tool, that is iTunes. Here we'll introduce you the simple steps to transfer music from iPhone to iTunes on your PC. Follow the tutorial below to give a shot.
Process to Transfer iDevice Music to iTunes


Start iTunes on your computer, here please make sure that the latest version of iTunes has been installed correctly on your PC/Mac.


Click "Go to the iTunes Store" button.


Click "Account > Authorizations > Authorize This Computer".


Next, log in with your Apple ID and password. Click on the Authorize button to complete the authorization process.Sponsor Ads:


Gihosoft iPhone Data Recovery is a professional iPhone Data Recovery software to get back all your lost text message, photo, video, call history, note, contact and more from iPhone/iPad/iPod Touch. It offers a full solution to recover your lost data in different tough situations. Besides recovering data directly from iPhone, iPad and iPod touch, it also allows you to recover data from iCloud and iTunes backup files.Image result for gihosoft iphone


Finally, connect your iDevice to your computer with the USB cable, then select "File >Devices", and choose "Transfer Purchases from iPhone" to finish the process.


Conclusion:


iMyFone TunesMate will provide a better solution to transfer your media files between your devices as compared to iTunes. With iTunes, there will be lots of limitations for the users. With iTunes, there will be one-way transfer, limited support, and compatibility as well as many more missing features. There can be different kinds of errors and it can cause data loss in your system.

How to Fix iCloud Backup Won’t Turn on (2019)

How to Fix iCloud Backup Won’t Turn on (2019)

Top 7 Ways to Fix iCloud Backup Won’t Turn on Issue


Knowing why iCloud backup button won't turn on is not enough. You need to know how to fix this issue. To help you out, we have researched on 7 ways you can use to make your iCloud backup turn on again.


1Sign out and back to Your iCloud Account


Sometimes, the reason as to why your iCloud backup won’t turn on is due to verification issues with your account. Logging out and then logging in can help fix this. But, how do you do it? Follow the steps indicated below:


Step 1: Open the iPhone settings.


Step 2: If your device is running on iOS 10.2 and above, tap the Apple ID, scroll down and tap on Sign Out. If your device is running iOS 10.1 or earlier, tap on iCloud and then Sign Out.


Step 3: Your device will ask you whether you want to erase all settings. Confirm this. You will be logged out from your iCloud account after the confirmation.


Step 4: Use the Apple ID and Password to sign in again. Check if the issue has been fixed.


2Reset Network Settings


The reason as to why you don’t have the ability to back up your device using iCloud may be as a result of a network issue. To fix this issue, perform a network reset. The following steps will help you reset your network settings:


Step 1: Open your device settings.


Step 2: Tap on General.


Step 3: Select Reset.


Step 4: Tap on Reset Network Settings.


Step 5: Confirm you want to reset the network settings.


3Check Your Wi-Fi Connection


Since iCloud can back up a large amount of data in a single backup, the backups can only work over Wi-Fi. For this reason, your device has to be connected to Wi-Fi for iCloud backup to work. Here is how you connect to Wi-Fi.


Step 1: Open Settings.


Step 2: Tap on Wi-Fi.


Step 3: Select the Wi-Fi network you want to connect to.


Step 4: If prompted, enter the Wi-Fi Password and tap on Join.


4Update Your Device


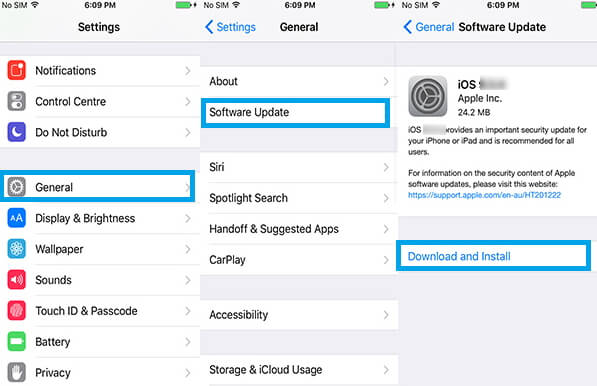
iCloud backup may not work if you don’t have the latest iOS system installed. Follow the steps below to update your iPhone:


Step 1: Visit Settings.


Step 2: Select General.


Step 3: Select Software Update to see if any updates are present.


Step 4: If any updates are available, go ahead and update the device. This may take a while, therefore, make sure you have enough battery.


5Restart You iPhone/iPad


Restarting your iPhone or iPad can help fix the bugs causing your iCloud not to turn on. Here are some simple steps to follow:


iPhone X


Step 1: You will need to press and then keep holding the device Side button together with one of the volume buttons. Wait until a slider appears.


Step 2: Drag this slide to turn the iPhone X off.


Step 3: After the device turns off, you need press and keep holding its side button for the second time until you see an Apple logo.Gihosoft iPhone Data Recovery is a professional iPhone Data Recovery software to get back all your lost text message, photo, video, call history, note, contact and more from iPhone/iPad/iPod Touch. It offers a full solution to recover your lost data in different tough situations. Besides recovering data directly from iPhone, iPad and iPod touch, it also allows you to recover data from iCloud and iTunes backup files.


iPad/iPhone 8 and Earlier


Step 1: You will need to press and then keep holding the side (or Top) button until a slide appears.


Step 2: Next, drag this slider to turn off your device


Step 3: When your device turns off, you will have to press and then hold the device side (or Top) button until an Apple logo shows.


6Factory Reset Your Device


Note that although this method has proven to be both convenient and efficient, it will erase your device data. Therefore, it should come as the last solution if the above solutions fail. To reset your phone, follow the steps indicated here:


Step 1: Launch Settings.


Step 2: Tap on General.


Step 3: Scroll down and tap Reset.


Step 4: Select the option for erasing all settings and content.


Step 5: Enter the Device password to confirm.


7Manage Your iCloud Storage


Maybe the reason as to why your iCloud backup can’t turn on is because the space available is not enough. To manage your iCloud storage, follow the steps below:
Check iCloud Storage Available


Step 1: Open Settings.


Step 2: Tap Apple ID.


Step 3: Tap iCloud.


Step 4: Tap Storage to see the space available.


Manage iCloud Storage


Step 1: Tap on Manage Storage.


Step 2: Tap on Backup.
Purchase More iCloud Storage


If there isn't enough storage, you may need to click Delete Backup to create room. If deleting your previous backups is not an option for you, you can choose fewer files to back up. You can also purchase more storage by following the steps below:


Step 1: Tap on Settings.


Step 2: Tap on Apple ID.


Step 3: Click Storage.


Step 4: Go to Manage Storage.


Step 5: Select Change Storage Plan.


An Alternative to iCloud for Backing Up iPhone with iTunes


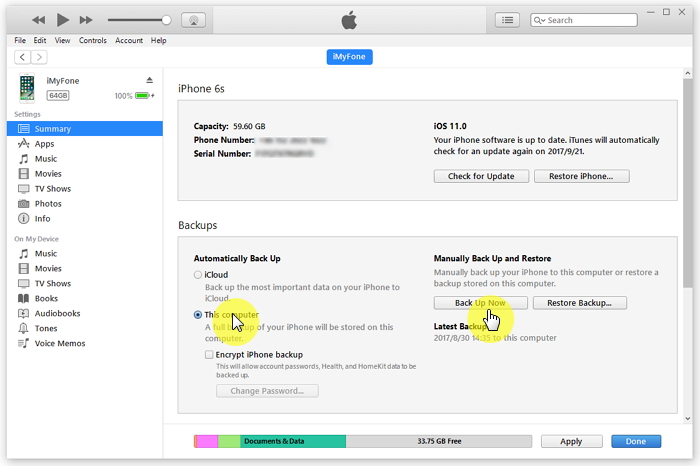
iTunes is another great backup method that Apple offers its device users. Using iTunes is not hard. By following the simple steps indicated below, you should be able to backup your iPad or iPhone on iTunes in minutes:


Step 1: Open iTunes on your Mac or PC.


Step 2: Connect the device to your computer.


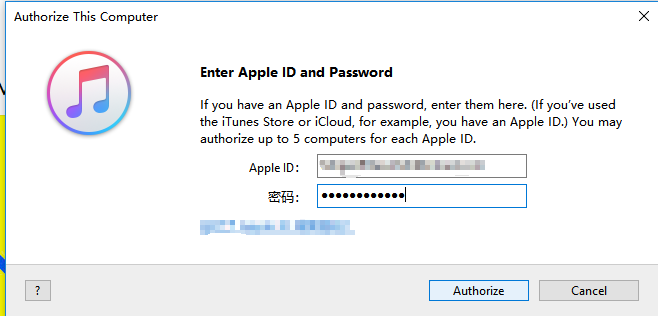
Step 3: Follow the onscreen steps if asked to Trust This Computer or for a passcode.


Step 4: Select your device when it shows on iTunes.


Step 5: To save your Health and Activity information, you have to encrypt the data. Select Encrypt [device] Backup and then create a password you can remember. For other data types, there is no need for encryption. Just click on Back Up Now.


Step 6: To see whether the backup is finished, check the Summary screen.


How to Fix “iPhone Keeps Going to Lock Screen” Issue


3 Simple Ways to Solve “iPhone Keeps Going to Lock Screen” Problem


The following are the basic solution to fix “iPhone keeps going to lock screen” issue. You can choose any of these solutions as a way to troubleshoot your iPhone.
1. Reboot Your iPhone


The following steps describe various ways to reboot different versions of iOS devices.


For iPhone X/8 Plus: Press the Volume Up button and quickly release it, then press and hold the Volume Down button and quickly release it, and finally press and hold the Power button until Apple logo appears on your iPhone screen.


For iPhone 7: Simultaneously press the On/Off button and the Volume Down button as the screen turns off and then turns back on and shows the Apple logo.


For iPhone SE/6s and earlier versions: Instantaneously press the Home and Power button, keep holding them until you see the Apple logo.


2. Reset all iPhone Settings


You can reset your iPhone iOS settings by following these steps:


Go to the Settings app and click on it.


Click “General > Reset > Reset All Settings".


Enter your Apple Password and confirm your request.


3. Update to The Latest iOS Version


Updating your iOS to the latest version can help to solve ‘iPhone keeps going to lock screen” issue.


Step 1: Launch iPhone Settings app from your Home screen.


Step 2: Click “General > Software Update > Download and Install”.


Step 3: Enter your Apple ID passcode, tap Agree to the Terms and Conditions and then tap Agree again to Confirm.Gihosoft iPhone Data Recovery is a professional iPhone Data Recovery software to get back all your lost text message, photo, video, call history, note, contact and more from iPhone/iPad/iPod Touch. It offers a full solution to recover your lost data in different tough situations. Besides recovering data directly from iPhone, iPad and iPod touch, it also allows you to recover data from iCloud and iTunes backup files.

Tips:

Restoring Lost Photos and Videos from iPhone

If you have deleted some of your pictures or videos from your gallery, then there is a straightforward way to Recover Deleted Files iPhone back.
After you delete the media files from your gallery, be it photos or videos, then you must know that iOS has a feature that the deleted media files doesn’t get deleted immediately, but it gets compiled to a temporary folder from where it gets deleted after 30 days. If you lost data after you updated to a new iPhone, you can always use Gihosoft iPhone Data Recovery to get the data back from the old iPhone or backup. Should you wish to recover these files, you must go to that “recently deleted” folder and retrieve these files before 30 days.
If you use android phones, please choose Gihosoft Android Data Recovery.


Friday, 15 June 2018

How to Create Custom Memoji on the iPhone X in iOS 12

How to Create Custom Memoji on the iPhone X in iOS 12


Step # 1. Launch Messages app on your iPhone X.


Step # 2. Now open a conversation then click on the icon Animoji in the menu bar.


Step # 3. Then you must slide right from the left and press on button +If you lost videos from iOS Camerall Roll which are nowhere to download again, you can use Gihosoft iPhone Data Recovery to get back deleted videos from iOS device including iPhone, iPad and iPod Touch.
Jihosoft iPhone Backup Extractor Extract and recover all types of data from iPhone backup files, such as camera roll photos, videos, SMS, contacts, reminders, WhatsApp, and etc.
Gihosoft Android data recovery Free is a super awesome software specialized in Android file recovery.


Step # 4. Then, it's time to customize your look.


Choose a pretty complexion from several options available. Choose the one you think best represents or the mood you are in! Check the slider that allows you to adjust the complexion.


Under Freckles, you have four options. While the first one looks pretty clean, the other three have some fixes. You can select one of four options


There is also an option to change hairstyle. With a variety of options at your disposal, choosing one that looks really cool or funky.
Gihosoft iPhone Data Recovery is a professional iPhone Data Recovery software to get back all your lost text message, photo, video, call history, note, contact and more from iPhone/iPad/iPod Touch. It offers a full solution to recover your lost data in different tough situations. Besides recovering data directly from iPhone, iPad and iPod touch, it also allows you to recover data from iCloud and iTunes backup files.


Check Storage on Mac – 5 Solutions (with Pictures)

How to See Storage on Mac In macOS, you can check the disk capacity and how the storage is being consumed by using the built-in utilities...